7TSP and iPack are great ways to change the themes and icon packs in Windows 10. There are no complex steps needed and they are as straight-forward as it could get.
Windows has changed quite a bit visually in the recent times. Windows 10 is a complete overhaul of Windows design language. Microsoft adopted a flat look with it’s Metro design language. While it initially received mixed reception, it has kinda grown on people as time went by.
Window has always been very theme friendly. In this article, let’s see how to change themes and icon packs using 7TSP and iPack.
How to install themes and icon packs using 7TSP?
Prerequisites
You need .NET Framework 3.5 enabled on your Windows 10 machine for this program to work properly.
Key highlights
- Patches the necessary (.mun) files & ignores .res files on Windows 10 1903 19H1 & above builds, hence avoiding boot loops & black screens when installing custom icons/icon packs.
- Note that patching .mun files will only work on a clean system. If you have pre patched .exe, .dll and .mui files prior to using 7TSP, the corresponding .mun file patch does not have any effect.
Steps to install themes and icon packs
- Download the latest version of 7TSP from here: 7TSP-GUI-v0.6.zip
- Extract the ZIP file and you will get two files. In that, double click on the
7TSP GUI v0.6.exefile. This is a portable file and no need to install it. The 7TSP tool will open automatically.
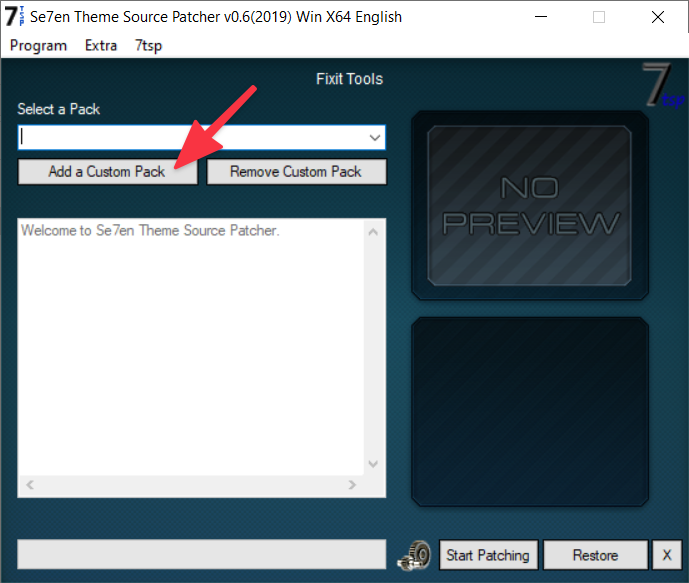
- In the 7TSP tool, click on the Add a Custom Pack option.

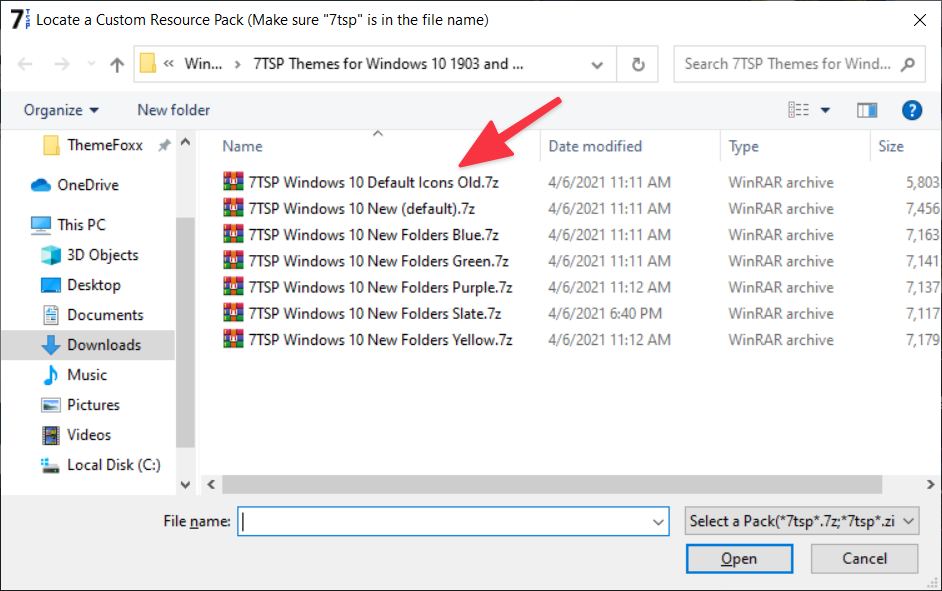
- You will be asked to select the icon pack/theme file. Browse and select the same.

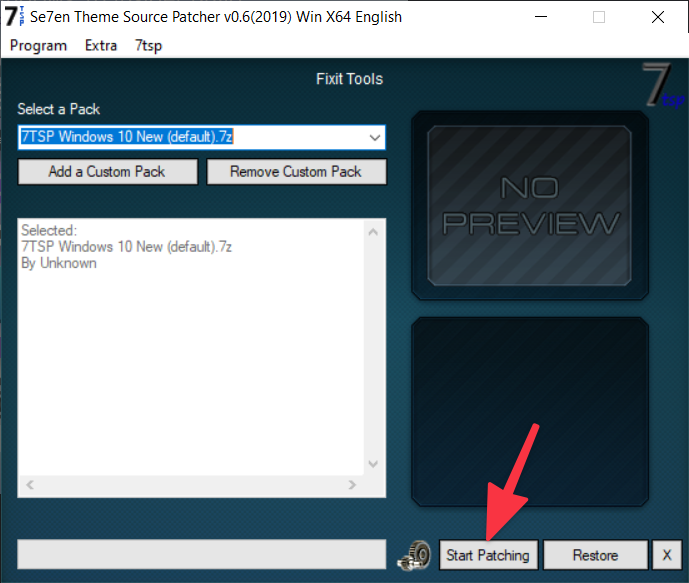
- Once you have selected the file, click on Start Patching button at the bottom.

- You will be asked whether to create a system restore point. I would recommend selecting yes.
- Wait for the process to complete and reboot your device.
Fix: Sorry, 7tsp only works with Windows Se7en! Error
If you encounter this error, the fix is pretty simple:
- Right-click on the 7TSP exe file and select Properties.
- Under the Compatibility tab, check the ‘Run this program in compatibility mode for:‘ box.
- Select ‘Windows 7‘ from the drop down menu and click Apply.
How to create a System Restore Point with 7TSP GUI?
By default, whenever you start to install an icon pack using 7TSP, it will ask whether to create a system restore point before starting the patching process. But, if for some reason, you want to manually create system restore point before getting started, you can easily do that as well.
- Open the 7TSP tool.
- In the menu, click on Programs and select Create Restore Point.
- Follow the on-screen instructions to create a restore point.
Frequently Asked Questions
How to use 7TSP GUI?
It’s pretty simple. Open the 7TSP GUI > Click on Add a custom pack > Choose your custom icon file > Click on Start Patching.
Do I need to install 7TSP GUI in order to use it?
No. It’s a portable .exe file. Simply double click on the executable file and it will open the 7TSP GUI.
Does 7TSP work Windows 10?
Yes, it works fine on Windows 10 without any issues.
What version of Windows does 7TSP Support?
7TSP supports Windows 7, Windows 8, and Windows 10.
Does 7TSP come with Windows icons?
No. It is just an installer. You need to download 7TSP compatible Windows Icon Packs to use with it.
Can I use iPack icon themes with 7TSP?
No, you cannot. Both are built differently with their own inbuilt mechanisms to change icons. You cannot use one with the other. You have to download 7TSP Compatible Windows Icon Packs.
